|
|
||
| Home :: Über mich :: CV :: Hobbies :: Download :: Bilder :: Fotos :: Modelle :: Links | ||
|
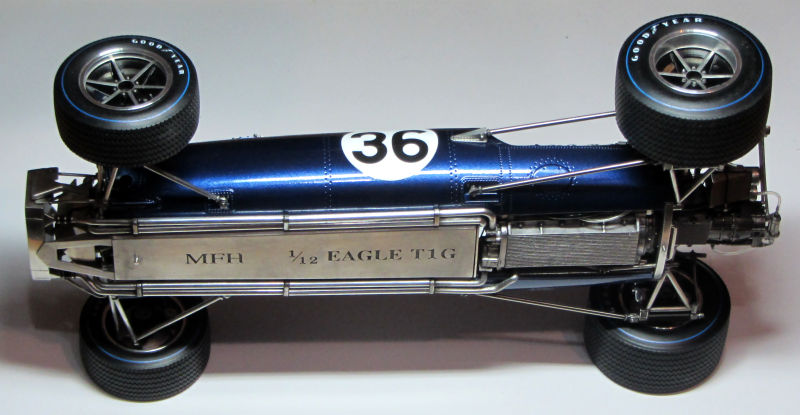
Baubericht / WIP Eagle Weslake, 1967, Dan Gurney Model Factory Hiro, 1/12 |
|
|
Hallo, hier gibt es den Baubericht des Eagle Weslake 1/12 Bausatzes von Model Factory Hiro. Der Kit besteht aus Resin-, Weissmetall-, geätzten und gedrehten Teilen, mit sehr vielen Details.
Hello, here you can find the WIP for the Eagle Weslake 1/12 scale model kit made by Model Factoy Hiro. The kit consists of lots of parts made from resine, white metal, turned metal and some photo etched part sheets. |
|
|
Zuerst mal ein Blick in die Schachtel... Let's have a look into the box... 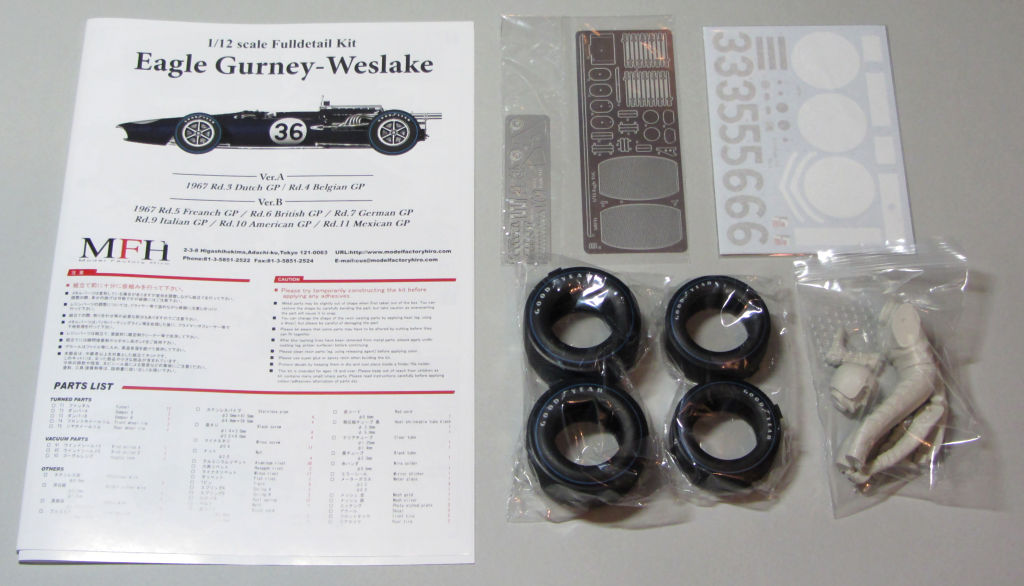
|
Farbiges Anleitungsheft, vorgedruckte Reifen, Fahrerfigur (im Wagen sitzend), Ätzteile, Decals Coloured manual, tires with printed lettering, driver figure (sitting in the car), etched parts, decals |
|
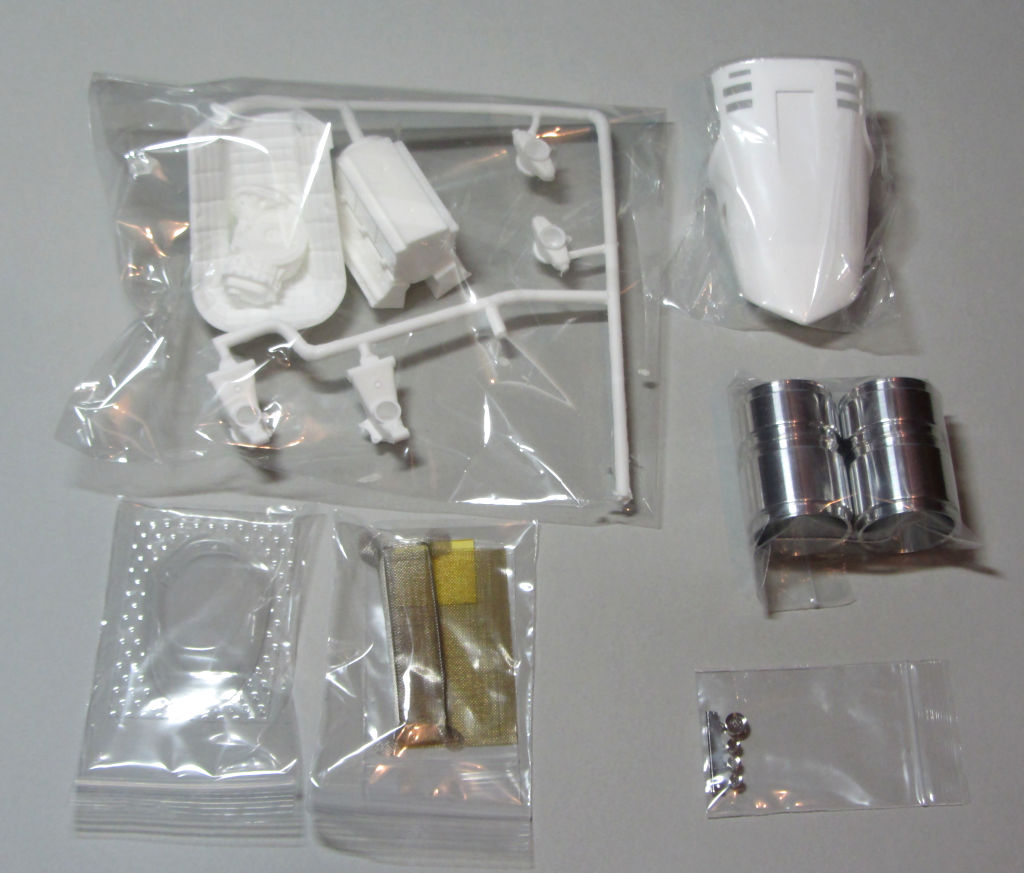
Resinteile für Nase, Motor, Getriebe, Sitz und Radträger, dazu Scheibe, Gitter, Felgen, Instrumente inkl "Gläser" Resine parts for nose, engine, gearbox, seat and uprights, windshield, mesh, rims, instruments including transparent "glass" covers |

|
Verkleidung aus Metall, Rohre, Schläuche, Federn, Nieten, Schrauben, Ansaugtrichter Bodywork made from white metal, tubes, hoses, springs, rivets, screws and the intake trumpets |
|
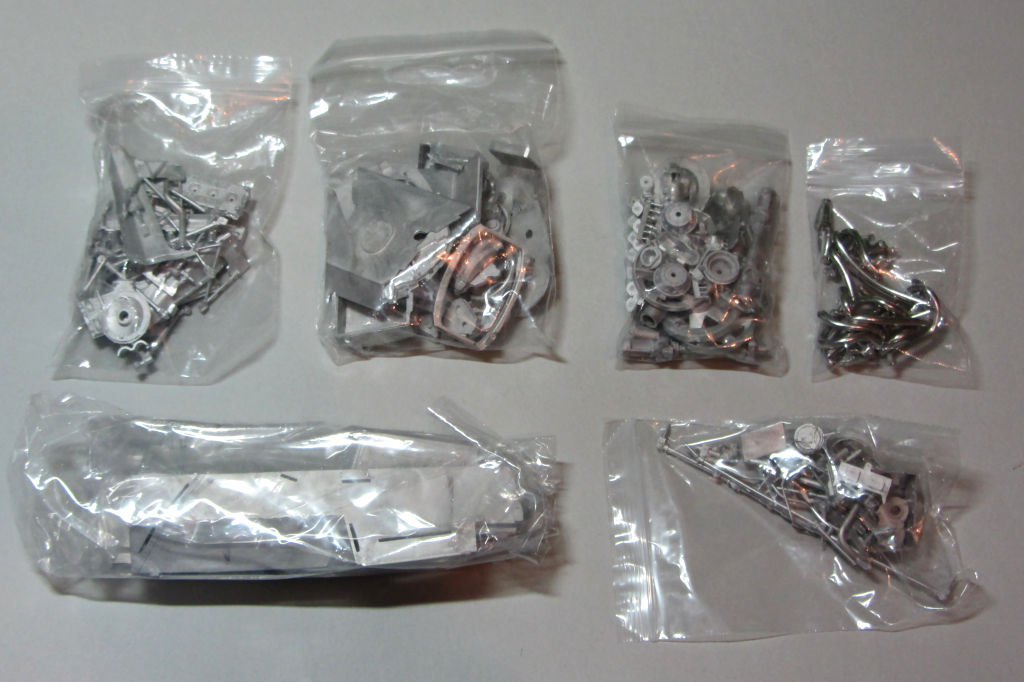
6 Beutel mit Metallteilen, groß bis klein 6 bags with many white metal parts, small and big |
|
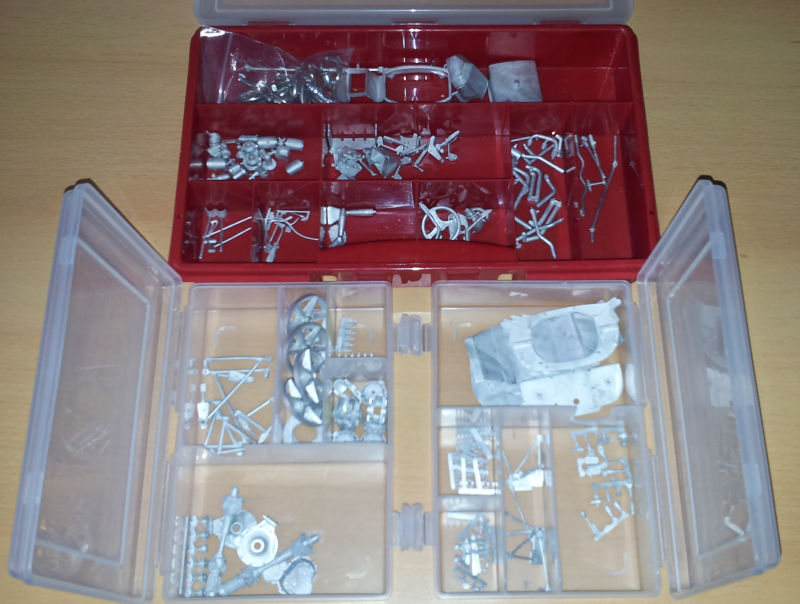
Erster Schritt: Die kleinen Metallteile in Kisten sortieren, um den Überblick zu bewahren. Ein paar sind hier schon nicht mehr zu sehen, weil ich bereits angefangen habe... First step: sort the little metal parts in boxes. A few parts cannot be seen here since I have already started... |
|
Ich habe mit der Nase begonnen - für den kleinen Lufteinlauf an der Seite muss ein Metallteil eingeklebt werden. Die Innenseite der Nase habe ich dazu
etwas ausgedünnt, damit das Metallteil vorn eben abschliesst und mit etwas Sekundenkleber für einen glatten Übergang verspachtelt werden kann. I started building with the nose. For the air intake on the sides, a metal part has to be glued in. I thinned the nose on the inside, so the front of the metal part is flush with the nose and you can see no seam after puttying with some instant glue. |
|
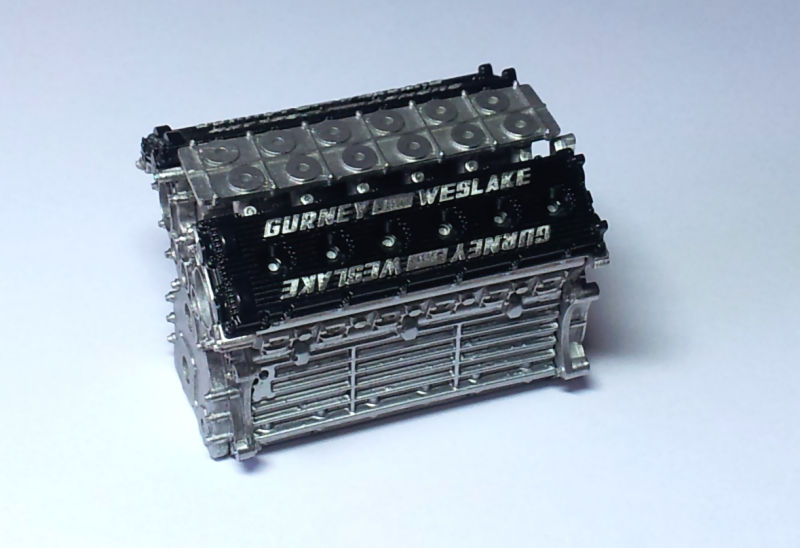
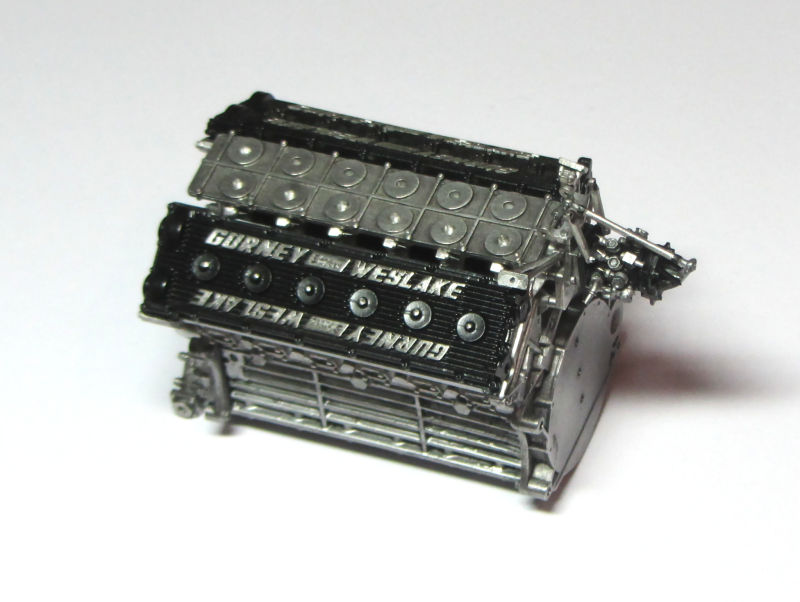
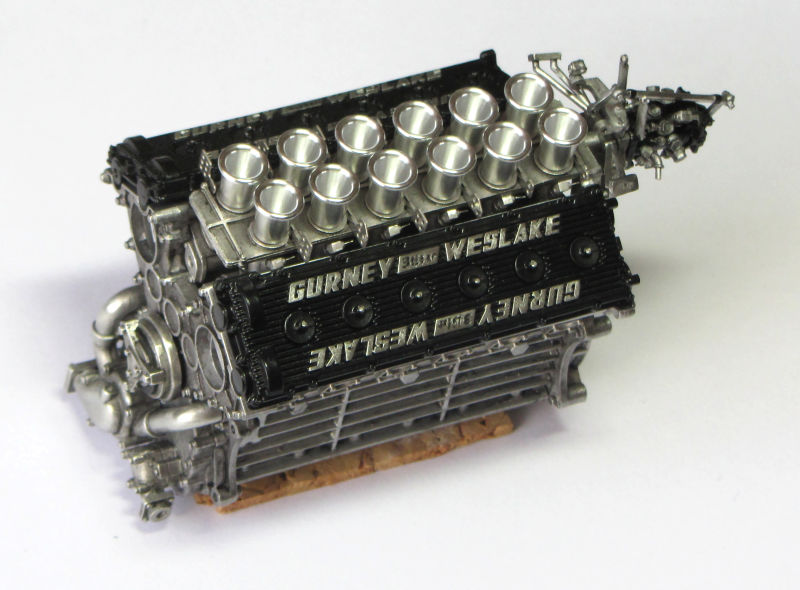
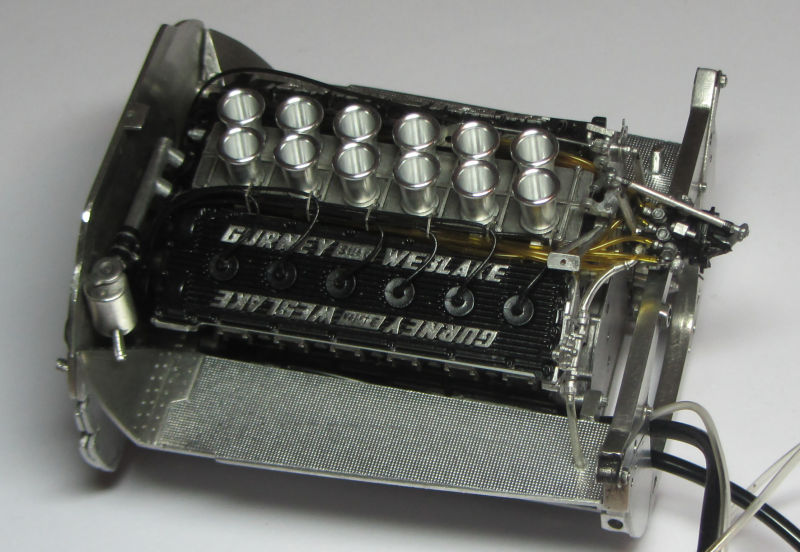
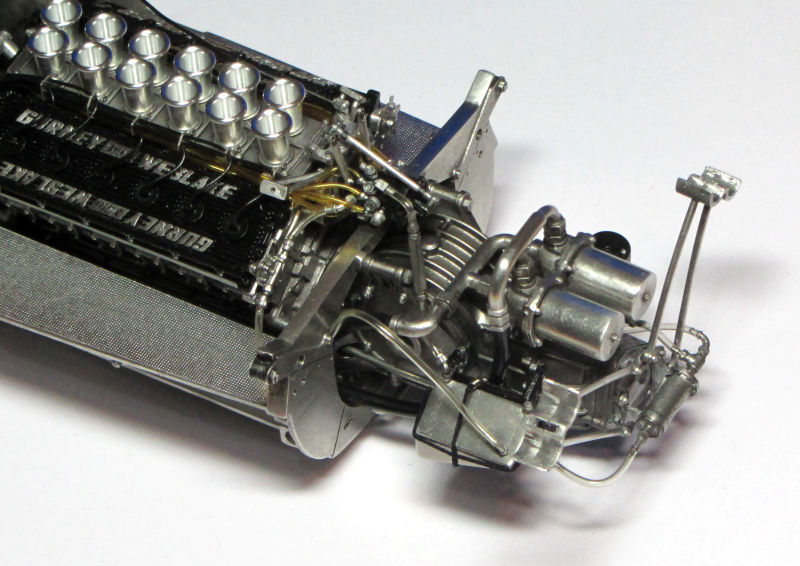
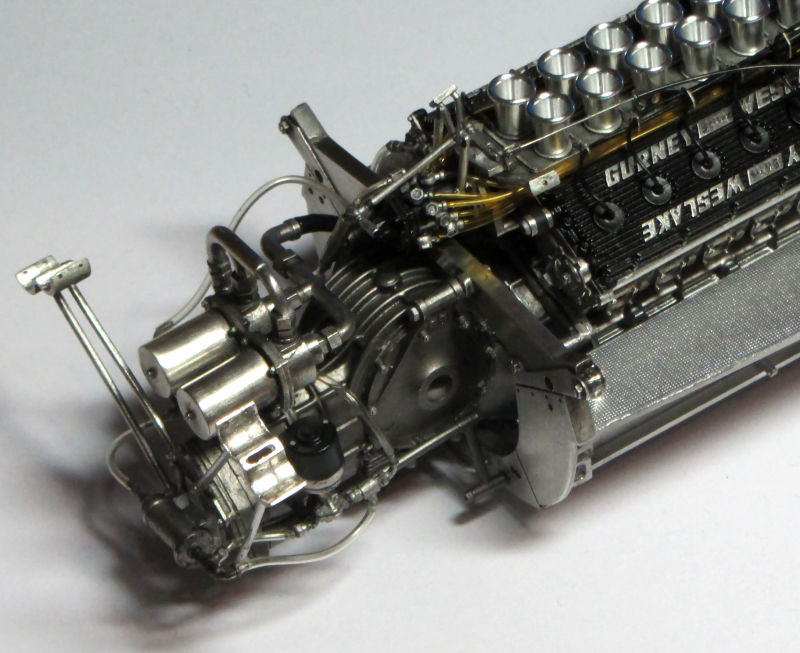
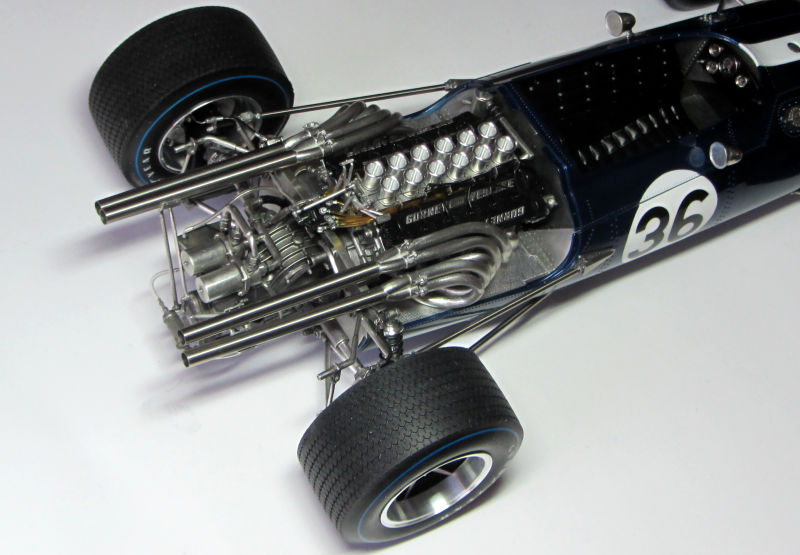
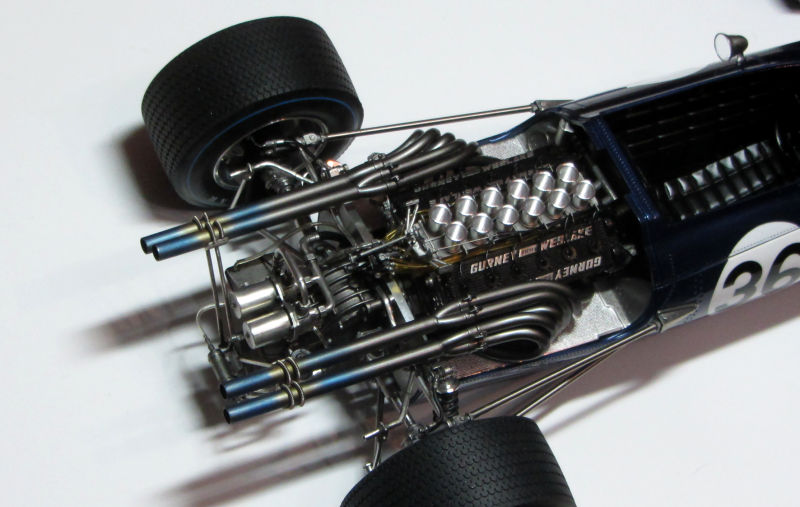
Hier schonmal ein Blick auf den Motor, ich habe einige Teile mal zusammengelegt. Die Ventildeckel habe ich schwarz lackiert und über der Beschriftung wieder weggeschliffen. Ich grundiere die zu lackierenden Metallteile (ausser der Karosserie) nicht; wenn etwas Farbe an den Kanten abblättert wirkt es realistischer wenn man das Metall darunter sieht, und keine Grundierung. Der Motorblock ist mit Alclad Aluminium mit einem Schuss Chrom lackiert. Rundherum wird er von vielen Metallteilen bedeckt, deshalb fällt es kaum auf, dass es Resin ist. Bei MFH Kits niemals vergessen: Alle Löcher für Haltepins vorbohren! Damit bin ich jetzt erstmal beschäftigt... As always with MFH kits, do not forget to drill out all the holes for holding pins; this will keep me busy for now... |
|
2 Stunden habe ich mit der Montage des Spritverteilers zugebracht, er besteht inklusive kleiner Pins zum Befestigen der Leitungen aus 32 Teilen. Die Schläuche werden dann nochmal ein Gefummel...
Die bereits erwähnte Motorbeschriftung war aber IMHO beim 1/20er Bausatz besser gelöst: dort war es ein Ätzteil, welches nach Abschleifen der Farbe eine super lesbare Schrift übrigliess, hier ist es direkt das Metall des Deckels, welches aber nicht fein genug ist um den "3 Litres" Schriftzug in der Mitte deutlich zu zeigen... I already mentioned the lettering on the covers; I think it was better in 1/20 where it was made with an etched part, which left clean lettering after sanding off the colour. Here it's the metal of the cover, which is not fine enough to show the "3 Litres" in the middle clearly... |
|
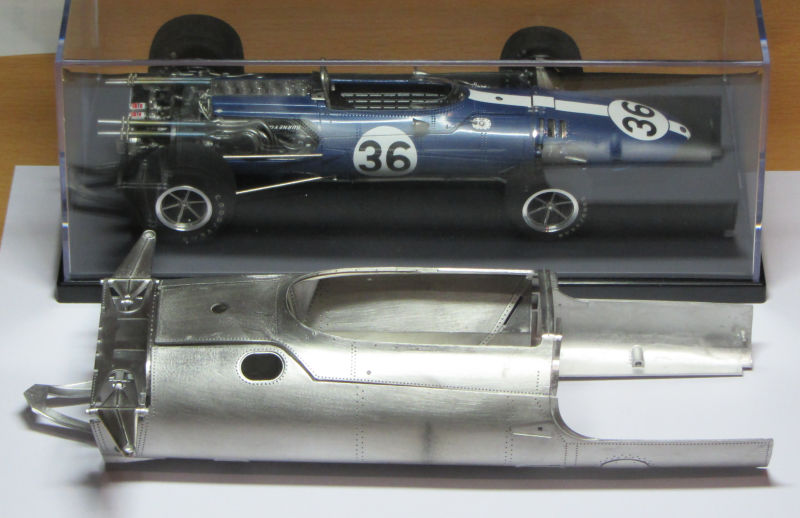
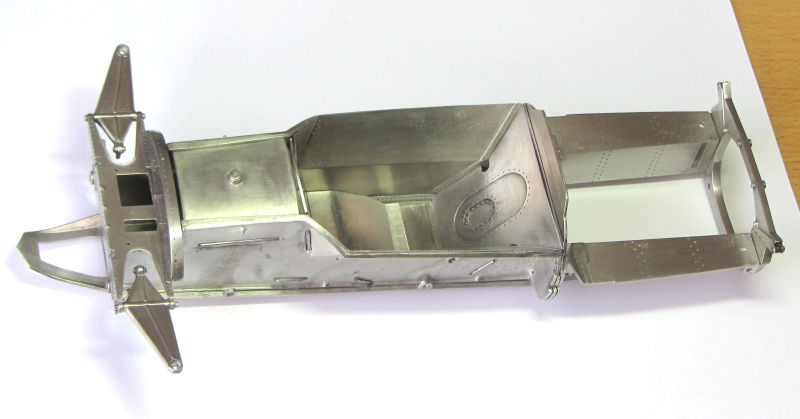
Nächster Punkt ist die Vorbereitung des Chassis. Die Gussqualität ist leider nicht so gut wie bei den MFH Kits die ich bisher gebaut habe. Stellenweise rauhe Oberfläche, einige Stellen die zu verspachteln sind, Grate, etc... allerdings verschwindet fast alles unterm Lack oder unter anderen Teilen, wie dem Sitzpolster, von daher nicht so ein massives Problem. Die Teile mal so zusammenzustecken ist aber schonmal Arbeit - man muss hier alles mehrfach probepassen, die Haltepins/Löcher anpassen, dass man später die lackierte Verkleidung auch ohne sie kaputtzumachen anbringen kann... Etwas komisch ist auch, dass die oberen vordere Aufhängung aus einem massiven Teil besteht. Vielleicht um das Gewicht des Kits auszuhalten? Zum Größenvergleich im Hintergrund der 1/20er. Next step is the preparation of the chassis. The quality of the metal parts is not quite as good as those of the 1/20 kits I built. Sports with a rough surface, some places that have to be puttied, etc... but most of it is not visible anyway, as it will be hidden under paint or other parts like the seat, so not that big a problem with the Eagle. I tried some dry fitting - this is real important work, to get everything to fit together nicely, so you can later put the painted cowling on without damaging it. This will be tricky... It's also bit strange that the upper front suspension is one massive part. In the background the 1/20 kit, to compare sizes. |
|
Damit zusammenhängend verbrachte ich dann einige Bastelabende mit dem Anpassen der Verkleidungsteile; schleifen, unsaubere Stellen verspachteln, schleifen, biegen, damit die Teile am Ende auch gut zusammenpassen, ohne große Lücken. Da ist eine Menge Arbeit nötig. Den Hauptteil des Monocoques habe ich bereits verklebt, andere Teile sind nur drangesteckt, man braucht aber auch die schon zum Passendmachen der Verkleidung. Diese dann Anzukleben benötigt wohl etwas kräftigeres Anfassen der Teile, deshalb werde ich zuerst diese Teile fertig lackieren, und dann einige Zeit zum Trocknen lassen. To continue with the previous step, I spent a few modeling evenings fitting the cowling parts; sanding, puttying, sanding, bending metal parts in place, to have them all fit together nicely at the end. This is quite some work. The main part of the monocoque I had glued together for this, the other parts are just dryfitted, but they are all needed to make the parts fit with each other. Glueing the cowling in place will probably not work with light and careful handling alone, so I'll spend the next days with the paintjob, to give it enough time to dry properly. |
|
OK, etwas anderes musste ich dann doch noch machen, um etwas Fortschritt zu sehen, deshalb habe ich die Ansaugtrichter und die Zündkabelhalter angeklebt. OK, I had to do at least some little thing to see some progress, so I glued on the intake trumpets and the ignition wire supports. |
|
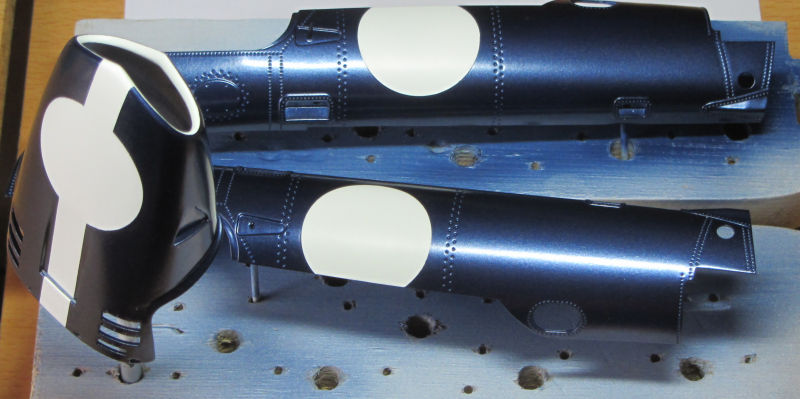
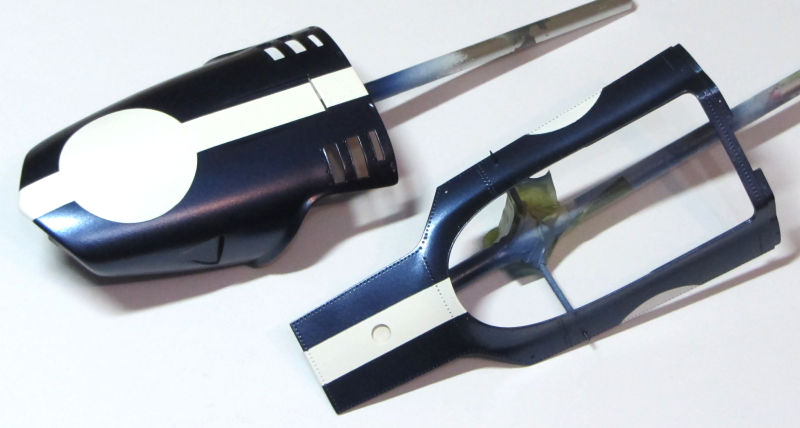
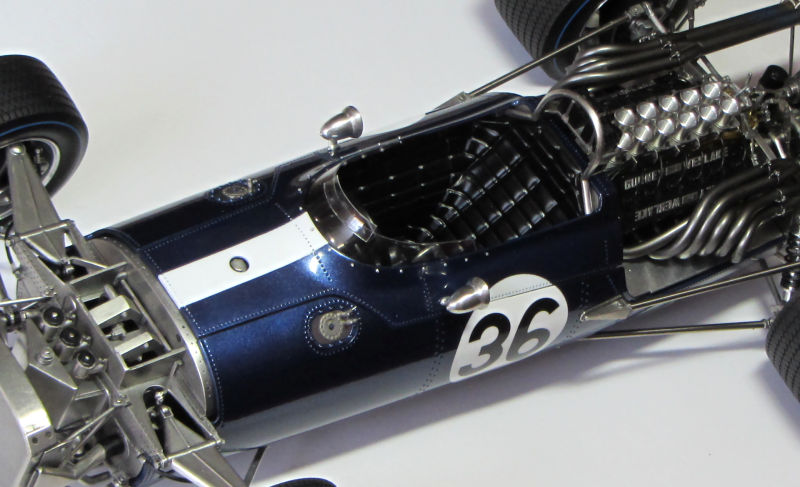
Ich hatte mich entschieden die weissen Flächen zu lackieren (also zu maskieren und dann Blau lackieren), und hier ist das Ergebnis: lief prinzipiell ganz gut, nur den Streifen auf der Cockpitumrandung, der eigentlich am einfachsten aussah, muss ich nochmal machen. Dazu noch ein wenig Nacharbeit, wie z.B. die kleine blaue Lücke zwischen Streifen und Startnummernkreis auf der Nase; das war mir zu schwierig auf Anhieb zu maskieren. Beim 1/20er waren alle weissen Decals doppelt dabei, hier leider nicht, sonst hätte ich es eher wie dort gemacht, und nur die Umrandung an der Nase maskiert und den Rest per Decal. Achtung: die Farbe ist von Zero Paints, und im Gegensatz zu den normalen Farben IMHO dünner und schlechter deckend, muss also in mehreren dünnen Schichten aufgetragen werden, was das Lackieren mit der Maskierung etwas erschwert. I decided to paint the white areas (i.e. mask them and paint the blue around), and here is the result: it went fairly well, I only have to redo the white stripe on the cockpit surround (which in theory was the easiest part) and then do some retouching, like the blue gap between stripe and number roundel on the nose which was to complicated for me to do in one go. The 1/20 kit did have all white decals included twice, the 1/12 does not, so I could not just mask the ring on the nose and use doubled up decals for the rest, which would have been my preferred option. Caution: I used Zero Paints Eagle blue, and the colour seems to be thinner than usual and not as opaque, so you have to airbrush several thin layers, which makes the paintjob with the masking a bit more difficult. |

|
Farblich scheint das Zero Paints Eagle Blau zu passen, aber abgesehen von den bereits erwähnten Farbeigenschaften gibts noch ein massives Problem: die Farbe scheint mit sich selbst zu reagieren, wenn man nochmal eine Schicht über schon getrocknete Farbe sprüht! Ich hatte den Nummernkreis an der Nase noch verfeinert sowie die Cockpitumrandung repariert, als beim Trocknen der Farbe auf einmal ein Grauschleier erschien, genau dort wo Farbe draufkam. Nochmal Farbe drübersprühen half nur an wenigen Stellen. Sowas war mir mit den Zero Paints noch nie passiert. Jetzt muss ich erstmal überlegen, ob ich das irgendwie reparieren kann, oder a) die betroffenen Teile entlacke und nochmal neu mache in nur einem Sprühgang, oder b) alle Teile komplett von der Farbe befreie und mir die Farbe nochmal aus anderen Farben nachmische... The colour of the Zero Paints Eagle Blue seems to be spot on, but except for the properties of the colour I already mentioned, there is another massive problem: the colour seems to react with itself when you spray a new layer on top of dried colour. I refined the roundel on the nose and repaired the cockpit surround, when immediately after the colour started to dry it startet to grey out whereever I had sprayed. Adding another thin coat helped only at a few places. I had not had this happen with Zero Basecoats before. Now I have to think on how to repair those spots, or whether I either a) remove the paint from the affected parts and do them again in just one session or b) remove the paint from all parts and mix the paint myself... |
|
Um dem Lackproblem auf den Grund zu gehen habe ich die 4 betroffenen Teile unterschiedlich behandelt: die beiden Motorverkleidungen entlackt und neu grundiert, aber auf Cockpit und Nase drüberlackiert. Dazu habe ich das gute Wetter genutzt um bei wärmeren Temperaturen zu lackieren. Das Ergebnis: Die beiden Verkleidungen haben super funktioniert, auf den anderen Teilen wurde es mit jeder Lackschicht schlimmer. Die Farbe verträgt es anscheinend wirklich nicht, mehrmals überlackiert zu werden. Also habe ich Nase und Cockpit entlackt - deprimierend wenn man nur wenige mm² vom Ziel entfernt war. Um mich aufzuheitern werd ich wohl auch ein paar Schritte am Motor weiterarbeiten... To find the cause for the paint problem, I treated the 4 affected parts differently today, also using the warmer weather today to be sure the colder temps last week were not the problem: I stripped the engine cowlings, primed and painted again and it was good, while the greying got worse on cockpit and nose with each layer. The colour really does not like to be painted over itself... therefore I now also stripped nose and cockpit, which is depressing if you had been just a few mm² away from getting it done. To cheer myself up I will probably also do some work on the engine next... |
|
|
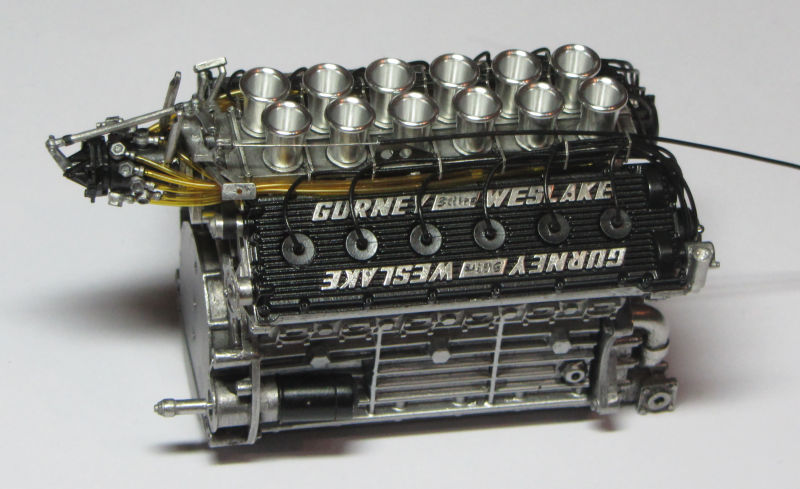
Wie gesagt ging es jetzt erstmal wieder an den Motor, dort habe ich die Zündkabel und Spritleitungen angebracht. Im Kit sind transparente Schläuche enthalten, aber mit größerem Durchmesser; laut Anleitung soll man die Schläuche ziehen um sie von 1.2 auf 0.7mm zu verkleinern. Angesichts der Tatsache, dass MFH ja selbst diverse Schläuche als Zubehör verkauft sollte man in einem 600EUR Kit dann eigentlich erwarten, dass sowas passend dabei ist. Ich habe dann aus der Zuberhörkiste Spritleitungen mit passendem Durchmesser genommen. Von MFH... As I said, I worked a bit on the engine, adding iginiton wires and fuel lines. There are transparent fuel lines in the kit, but with a bigger diameter. The instructions ask you to stretch them from 1.2 to 0.7mm diameter. Well, since MFH offers all kind of wires and hoses as addon parts, I would expect some with the right size to be included in a 600EUR kit. Well, I took some fuel lines from the parts box and used those instead. Made by MFH... |
|
Ich habe weiter am Motor gearbeitet, sowie am Rundherum. Die Teile seitlich neben dem Motor waren mit einem geriffelten Hitzeschild bedeckt. Im Bausatz war leider nichts enthalten (wiederum im Gegensatz zum 1/20er) aber ich hatte noch MFH Folie für diesen Zweck - passt dort auch besonders gut, weil sie die an dieser Stelle rauh gegossene Oberfläche bedeckt. Dann habe ich den Motor in den Rahmen eingesetzt - wichtig gut zu probieren in welche Folge man die Teile zuusammenbaut. I continued to work on the engine. The sidepods next to it were covered with heatshield. Unfortunately nothing was included in the kit (again unlike the 1/20 version) but I still had some MFH adhesive foil for this occasion. This also helps to hide the roughly cast surface on this part. I then mounted the engine in the frame; take your time in working out which way to put the parts together works best for you. |
|
Im zweiten Versuch hat die Lackierung besser geklappt. Nur ein paar kleine Stellen sind auszubessern, was ich mit dem Pinsel machen werde, genauso wie die blaue Lücke zwischen Streifen und Nummernkreis auf der Nase. Ich bekomme die Farbe aus Aquacolors gut nachgemischt, das sollte keine größeren Probleme geben. Jubeln werde ich aber erst, wenn die letzte Klarlackschicht drauf ist. The second attempt with the paintjob worked. Only a few minor spots have to be touched up, which I will do with a brush, as well as the gap between the stripe and the nose roundel. I can mix the colour from Aquacolors, so there should not be major problems. But celebrations will only start after the final layer of clear is dried. |
|
Nach der ersten Schicht Klarlack zum Schutz der Farbe konnte ich nicht anders als die Teile mal zusammenzulegen. Sieht ganz gut aus, denke ich. Die Lücke zwischen Cockpitumrandung und Seitenteil verschwindet, wenn die Seite richtig ans Chassis angepasst ist. After the first layer of protective clear, I could not resist dry fitting the bodyparts, and I think it looks quite good. The gap between cockpit surround and the side part disappears if the latter is properly fitted to the chassis. |
|
Heute kein Bild sondern etwas Text, der eventuell anderen hilfreich sein könnte. Im letzten Schritt schrieb ich über das Anpassen der Seitenteile ans Chassis. Das gilt genauso auch für die Cockpitumrandung. An der Spritzwand muss man einiges an Material wegnehmen, damit das auch alles zusammenpasst. Wichtig sind auch M78 und M29 (das zylinderförmige Gebilde an der Motorseite der Spritzwand); wenn das zu weit oben und aussen angebracht ist, passt die Cockpitumrandung nicht richtig drauf, weil sie dort aufliegt. Also eher nen Milimeter weiter unten anbringen und den Deckel oder seine Halterung flacher machen. Alles recht kompliziert aneinander zu passen, denn man bräuchte mehrere Hände, oder müsste Teile verkleben, die man noch nicht verkleben will, weil man noch lackieren will oder noch nicht weiss obs so passt... No pic today, but maybe some helpful hints for other builders. I wrote about fitting the sides to the chassis. The same goes for the cockpit surround. Be prepared to remove some material from the bulkhead between cockpit and engine. Also make sure M78 and 29 (the cylinder on the engine side of the bulkhead, don't know what it's for) are not mounted to high or to far to the outside, or the cockpit surround will rest on top of it and will not fit. So mount it a mm lower and remove some material from the bottom of the cap or it's mount. Making everything fit is not the easiest work all around, as you would need more hands, or you would have to glue some parts you don't yet want to glue, before painting or before knowing if everything fits. |
|
|
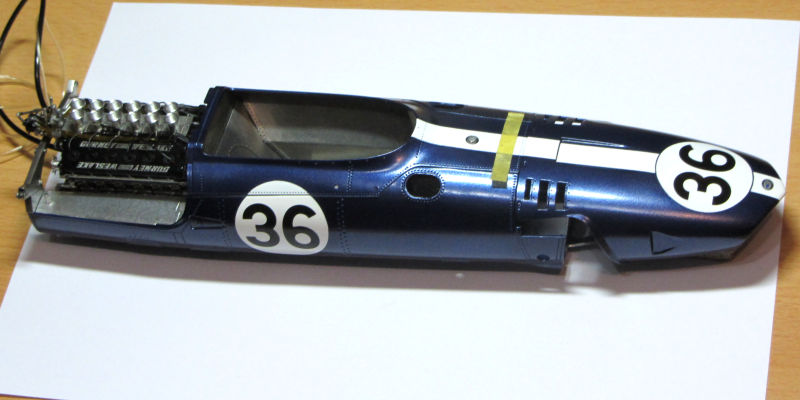
Fast das gleiche Bild wie gestern, aber ein kleiner Unterschied. An Decals waren nur die Startnummern und das Logo auf der Nase anzubringen, das war also schnell erledigt. Die Cockpitumrandung passt wie erwähnt jetzt auch besser, wenn ich die Teile mit Tamiya-Tape mal zusammenhalte. Almost the same picture as yesterday, but just a little difference. I only had the number decals and the logo on the nose to apply so it was a quick job. As I mentioned, the cockpit surround fits better now, when I hold the parts together with some Tamiya tape. |
|
Nächster Schritt war die Montage des Getriebes, und dem ganzen Drumherum. Keine gröberen Probleme. Für das Seil, was den kleinen (Öl?)Tank links am Getriebe halten soll, empfehle ich z.B. elastisches Garn zu verwenden, dann siehts wirklich wie ein Spannseil aus. Next step was building the gearbox and attaching the surrounding acessories. No problems here. I suggest to use elastic yarn for the tension rope holding the small oiltank(?) on the left side of the gearbox, it looks more real that way. |
|
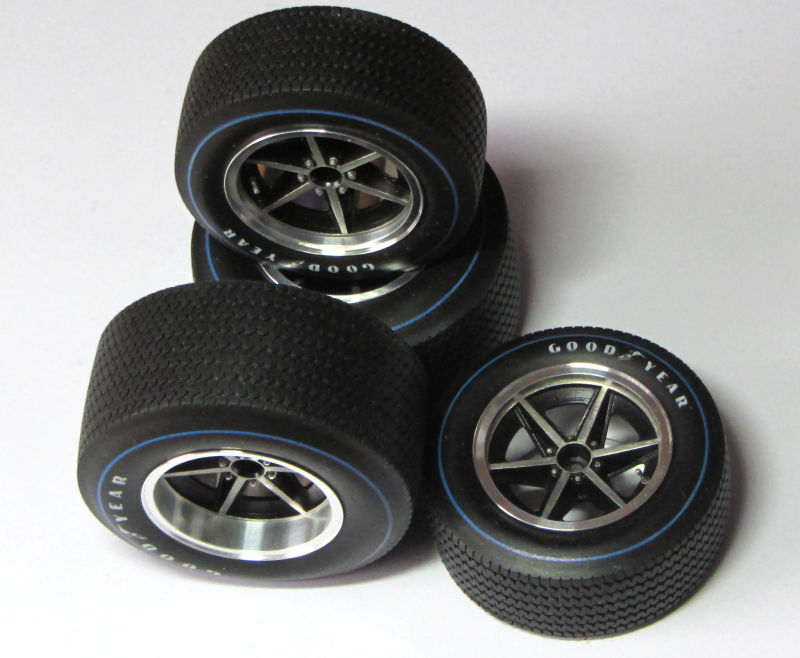
Die Reifen sind mit Logo und blauem Streifen vorbedruckt, die Felgen sind gedrehte Aluminiumteile. Den Radstern habe ich schwarz lackiert und dann an den passenden Stellen die Farbe weggeschliffen. Die 6 Radbolzen sind übrigens auch einzelne Teile... The tires are pre printed with logo and blue stripe, the rims turned aluminium parts. I painted the wheel center inserts black and then sanded the color away where needed. BTW: the 6 wheel bolts were seperate parts as well... |
|
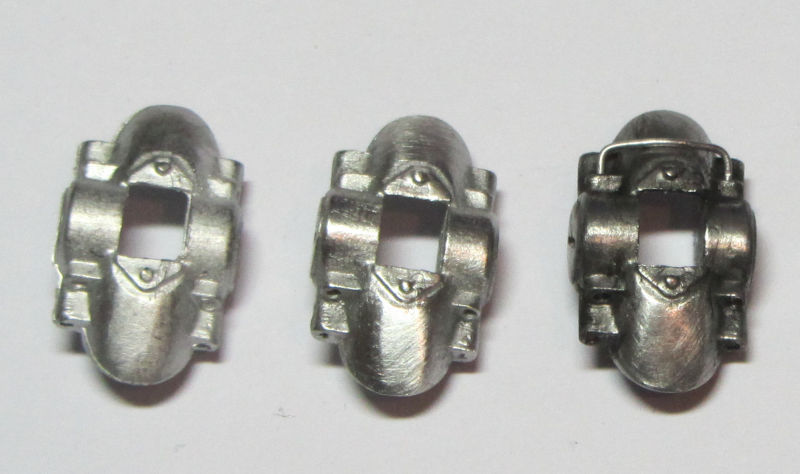
Für diejenigen die noch nie Metallteile im Modell verbaut haben, hier mal ein Bild um die einzelnen Schritte bei der Bearbeitung zu zeigen: Links das Teil so wie es in der Schachtel liegt, in der Mitte nachdem es gesäubert und mit Schleifvlies und Stahlwolle behandelt ist, und rechts mit einem Washing mit stark verdünnter schwarzer Acrylfarbe. Danach (nicht im Bild) habe ich nochmal leicht drüberpoliert. Für die deutlicher sichtbaren Teile kann man natürlich noch mehr polieren, aber für diese Teile reicht das so für mich. For those who never built a model with metal parts, here is a small picture showing the work steps: On the left the part as you can find it in the box, in the middle the part was cleaned and sanded with Micromesh and steel wool, and on the right side I have applied a washing of thinned acrylic black. Not shown it the step, where I have polished a bit over the washed parts. Other parts that are more visible could (should?) be polished a bit more in Step 2, but for those parts it's enough for me. |
|
Hier noch die nächste Baugruppe am vorderen Ende des Wagens, die Pedalbox und Flüssigkeitsbehälter. Die Leitung aus Lötzinn wird nach dem Zusammenbau mit einem anderen Teil verbunden. Here is a shot of the next subassembly at the front end of the car; the pedal box with fluid reservoirs. The pipe made from solder wire will be connected to another part after assembly. |
|
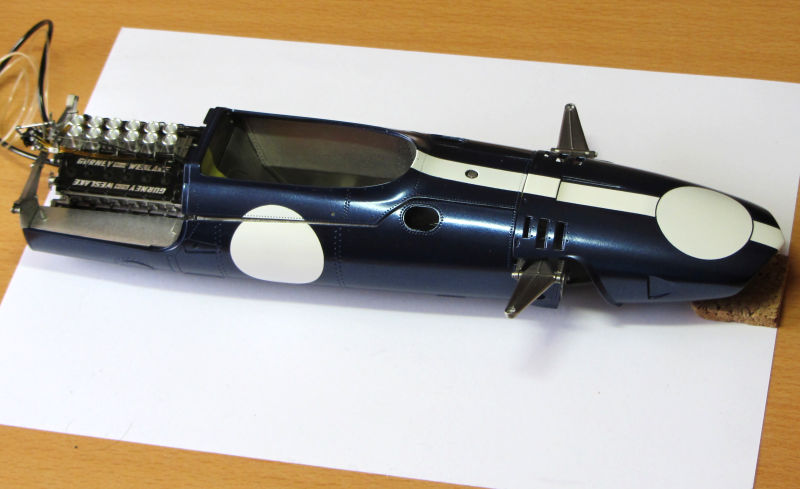
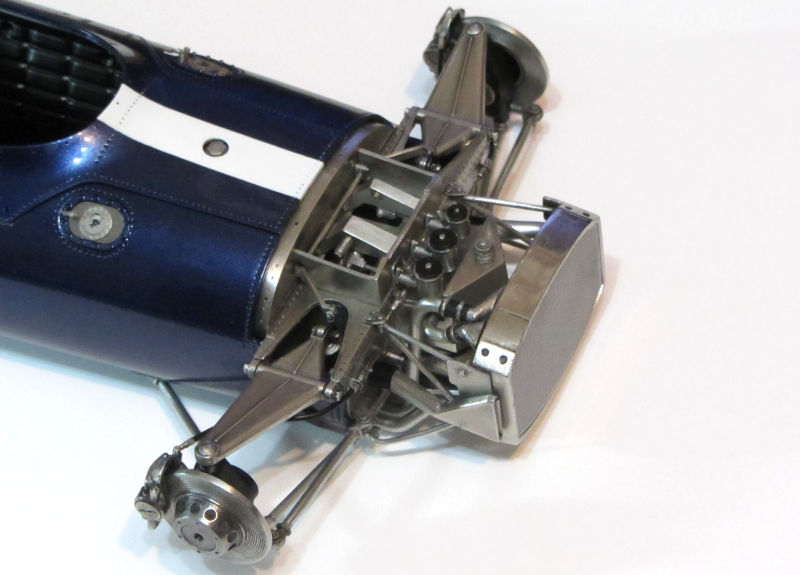
Der Schritt auf den ich mich gefreut habe, vor dem ich aber auch etwas Bammel hatte... Nachdem ich einige Teile der vorderen Aufhängung fertig hatte, konnte ich die seitlichen Verkleidungsteile ankleben... und es passt. Nicht ganz 100% aber weitaus besser als befürchtet. Die Cockpitumrandung kann ich noch etwas anpassen, das Vorderteil lässt sich noch ein klein wenig biegen. Dann hab ich die Nase noch mit etwas Draht provisorisch befestigt, und jetzt siehts nach Eagle aus. Ich betone nochmal, dass man den Klarlack richtig gut getrocknet haben sollte, denn um die Verkleidung anzubringen darf man sie nicht mit Samthandschuhen anfassen... Die Anbringung der unteren Dreieckslenker mit einer Schraube durch ein Anhängsel was wie Gussast aussieht ist aber so nicht machbar, das Teil bricht beim Bohren gleich ab, da muss man sich was einfallen lassen - ich habe einen Stab angeklebt, der nach innen geht und das Teil festhält. This step I was waiting for, but also afraid of... After doing a few parts of the front suspension I could glue the cowlings to the chassis... and it fits. Not 100% but much better than I feared. I can still make the cockpit surround fit a bit better, as the front part can be bent in place a little bit. I also dry fitted the nose with some wire and now it looks like an Eagle. Again, make sure your clear coat on the cowling is thouroughly dried - you need to handle those parts pretty strongly to attach them. Attachment of the lower V-links with screws through little rectangular attachments does not work however, as these will break when drilling, so I put a small rod through the front link to glue them to the inside. |
|
Als nächstes habe ich an der Front weitergearbeitet: Aufhängung, Kühler, Rohre, etc... die übliche Fummelei bei den alten Wagen, aber es ging am Ende doch ganz gut. I continued to work on the front: suspension, cooler, pipes, etc... the usual fiddling around with cars of those era, but it worked out OK. |
|
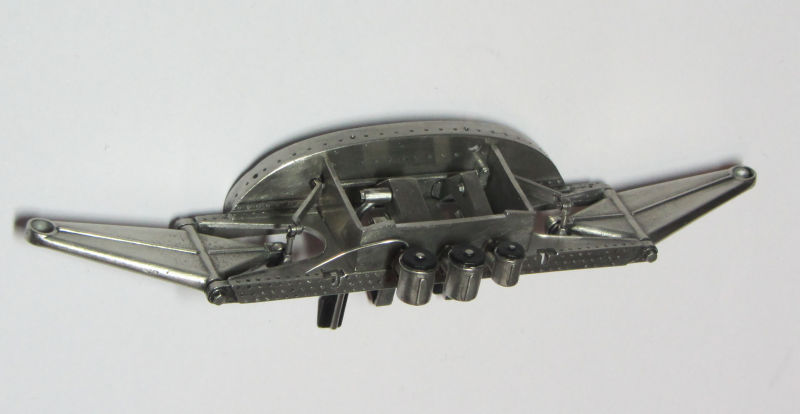
So langsam wurde es Zeit, dass der Wagen auf seinen eigenen Rädern steht. Deshalb habe ich, nach mehreren Stunden die ich mit dem Säubern der Metallteile verbracht habe, die hintere Aufhängung montiert. It was time, that the car stood on it's own wheels. Therefore, after a couple of hours spent cleaning metal parts, I attached the rear suspension. |

|
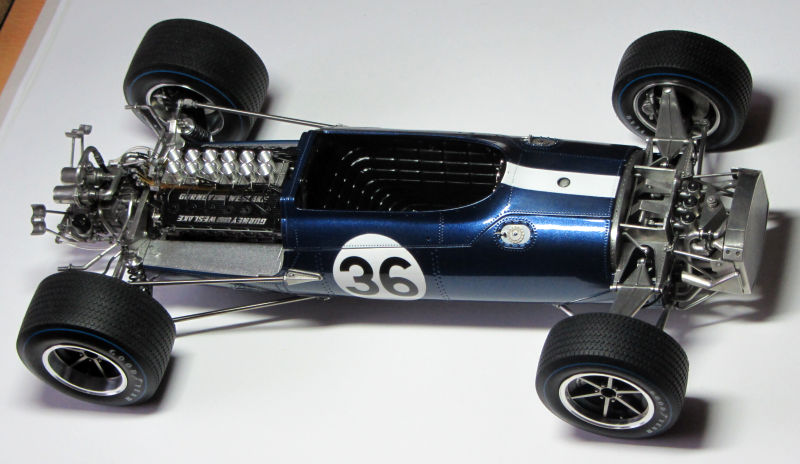
Das Ganze liess sich sehr gut bauen, es hat alles gut gepasst, und der Wagen steht problemlos ohne zu Wackeln. Man sollte nur wirklich immer mehrmals probepassen, ob die Löcher die man gebohrt hat groß und tief genug sind. Everything whent together smoothly, the parts fit well, the wheels all touch the ground well aligned. You just have to dry fit to test if all the drilled holes in the parts are wide and deep enough. |
|
Zur Abwechslung ein Blick auf die Unterseite, auch dort waren einige Rohre zu verlegen. For a change a view of the lower side of the car, where a couple of pipes had to be attached. |
|
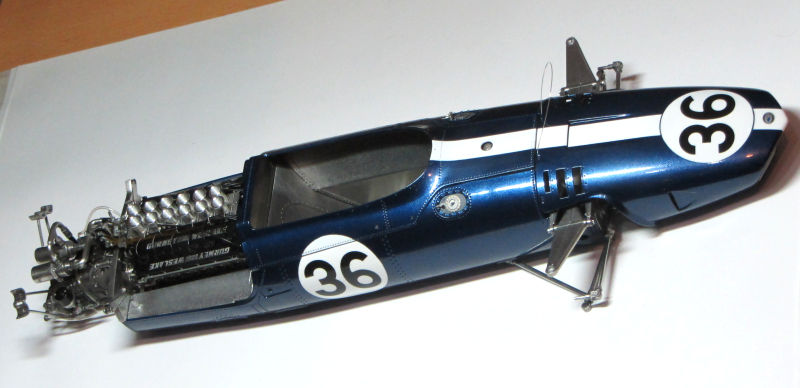
Auch die Auspuffrohre habe ich schonmal zusammengeklebt und zum Anpassen drangesteckt, für die Spa Version müssen diese aber noch lackiert werden. I also glued the exhaust pipes together and dry fitted them to the engine, but for the Spa version, those will have to be painted. |
|
Die Rohre sind lackiert und montiert. Auf Alclad Steel habe ich mit dem Tamiya Weathering Set die Hitzespuren angebracht. Die Längen der Rohre waren nach dem montieren irgendwie leicht unterschiedlich; auf den Bildern die ich habe waren Sie entweder gleich lang oder die inneren symmetrisch kürzer - ich habe dann ein Rohr abgesägt um die zweite Option umzusetzen. Ich habe aber nach wie vor keine Ahnung wie man die Federn aus dem Kit als Endrohrbefestigung sinnvoll anbringen soll, deshalb habe ich diese mit gebogenen Gitarrensaiten hergestellt. The exhausts are painted and attached. I used the Tamiya weathering set for the heat stains. The exhausts somehow ended up having different lenghts, but on all the pictures I saw they were either the same length at the back or the inner pipes were symetrically shorter. I cut off the end of one pipe to make the second option. However I still have no clue how you are expected to use the included springs to hold the exhausts, therefore I used pieces of guitar stings for the exhaust mount. |

|
Dann habe ich auch noch ein paar Nieten und Ätzteile an der Nase angebracht. Then I also attached some rivets and etched parts to the nose. |
|
Nächster Schritt war das Anbringen des Überrollbügels und der Windschutzscheibe. Letztere wird mit Nieten befestigt - zum Anbringen ist es besser diese in ganzer Länge in die Löcher zu stecken und hinterher innen abzuscheiden. Die Löcher in der Scheibe bohrt man an den darin angedeuteten Stellen. Vielleicht sähe es auch besser aus, nur von aussen die Nietenköpfe einzustecken und die Scheibe von innen anzukleben, dann sind keine Bohrlöcher sichtbar. Next step was to attach the roll hoop and the windscreen. The latter one is attached with rivets, which should be put in the holes in full length and cut after attaching the screen, to make assembly easier. The holes in the screen have to be drilled at marked points, but maybe it would have been better to just insert the rivet heads and glue the screen from the inside. that way you would not have the drilling holes visible on the inside. |
|
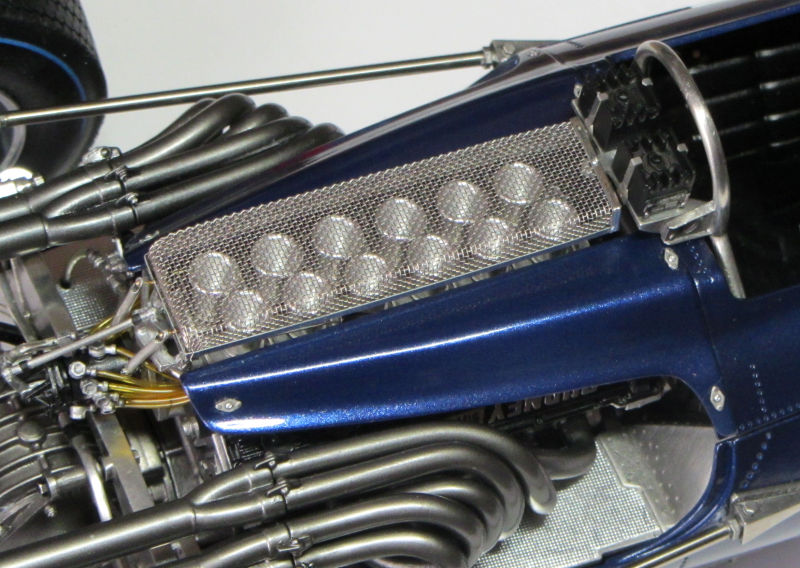
Der letzte Schritt, das Gitter über den Trichtern. Es lässt sich ziemlich schlecht zusammenbauen, der Ätzteilrahmen hat z.B. keine Falzmarken. Aber wenn man sich die Bilder vom echten Wagen ansieht, war das auch nicht allzu gerade, von daher ist es ja ziemlich realistisch. Als nächstes kommen die Galeriebilder. The last step, the mesh over the trumpets. It's difficult to assemble, the etched frame has no folding marks for example. But the real mesh is a bit skewed, too, so no problem. Next up: Gallery pics. |
| © 2004-18 Marco Saupe • Impressum | |